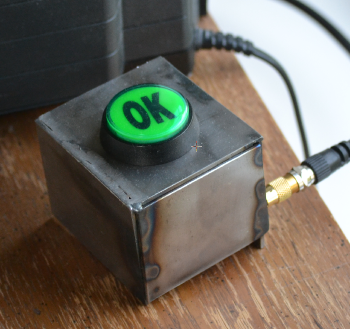
As a member of Make-It Labs, a hackerspace in Nashua, NH, I have access to some great resources for the project. The first being a gigantic "arcade"-style button, perfect for hitting in the dark in the middle of the night. Around this, I used some scrap metal and my newly acquired welding and metal-working skills to fashion a crude box. I was in a rush to do it - I suppose I should finish it better, or power-coat it, grind it out - or maybe even make a better one, but at least it works
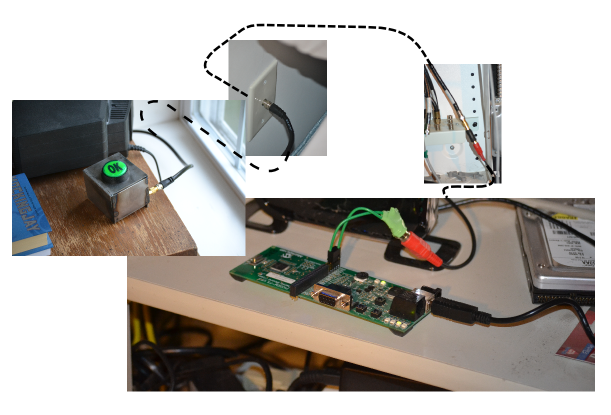
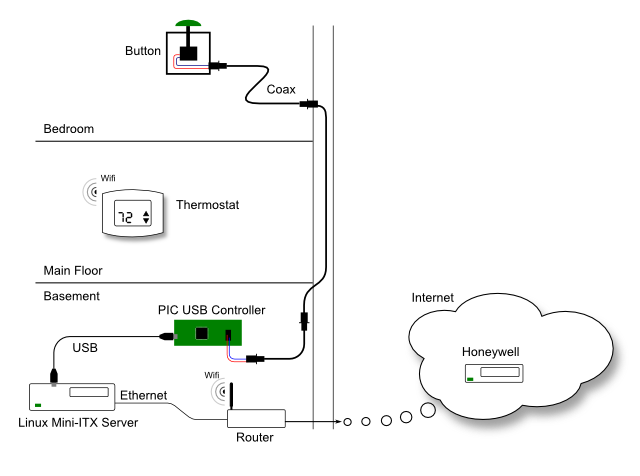
I connected the button to a coaxial connector, so I could use the unused cable-TV coax drop in the bedroom to connect the button to my server in the basement.
At the other end of the coaxial cable in the basement,
I used an old PIC USB demo board to make an USB interface to my Linux box.
The Wifi thermostat is actually controlled via Honeywell's web site. They have some sort of "cloud" service that you can connect to and make changes to your thermostat - and they actually talk back to your thermostat from there to apply the settings. I hacked the web traces (via a Chrome session) to create a Python script that goes on my Linux machine that emulates a user logging into the web site and setting my thermostat.
In action:
So - my little USB demo board emulates a serial port. When the button is pressed, is kicks out a character. My Python script waits for the character, then tells Honeywell's web site to set my thermostat 2 degrees colder for the next two hours. There's a little other logic - for example, if the temperature is set to anywhere about 72 degrees - just drop it down to there, and if the A/C is currently running (trying to cool down already), don't do anything at all. So for example, if you just whack the button 10 times, it wouldn't just blindly drop the temperature down 20 degrees!
Script
Updated June, 2015 to include small fix in Honeywell's API. Separated authentication parameters to separate optional module
Updated September, 2014 to include a fix for a change in the autentication protocol on Honeywell's side
The script is a little dirty, but here it is. (Version 1.1, September, 2014). Honeywell apparently uses some Microsoft ASP .NET crap, so the majority of the script is just dealing with session setup and cookies. There are four basic passes to the web site:
Make an initial connection - get an initial session token
Pass login credentials, gives you back a session cookie and redirects you to a web page
Go to redirected page, by passing session cookies - now we're "logged in"
Read current thermostat settings - returned in JSON format
Optional: If we decided we actually need to change any settings - POST changes in JSON format
A lot of the code just deals with passing back and forth cookies, stripping out fields that must not be returned. (Gotta love ASP sessions).
The JSON messages are pretty self explanatory, and I included examples of both inbound and outbound messages in the script. An example message to cancel any holds and return to regular program is:
CoolNextPeriod: null
CoolSetpoint: 75
DeviceID: 12345
FanMode: null
HeatNextPeriod: null
HeatSetpoint: null
StatusCool: 0
StatusHeat: 0
SystemSwitch: null
The "device ID" is your thermostat's unique ID. Here's an example which sets the cool setpoint for a specific amount of time:
CoolNextPeriod: 12
CoolSetpoint: 74
DeviceID: 12345
FanMode: null
HeatNextPeriod: null
HeatSetpoint: null
StatusCool: 1
StatusHeat: 1
SystemSwitch: null
The "CoolNextPeriod" and "HeatNextPeriod" parameters require special explanation they represent the time at which you want to resume the normal program. They are represented as a "time-of-day". The number represents a time period of 15 minutes from midnight, (just as your thermostat can only allow you to set temporary holds which end on a 15-minute boundary). So for example, if you wanted a temporary hold which ends at midnight - set the number to zero. If you wanted it to end a 12:15am, set it to 1. For 12:30am, set it to 2, etc. Needless to say, this allows you to only set temporary holds up to 24-hours. If no NextPeriod is specified however, this will effectively set a "permanent" hold, which must be subsequently manually candled.
The inbound JSON message (returned from the "third" request above) returns the following data:
{
    "alerts": "\r\n",
    "communicationLost": false,
    "deviceLive": true,
    "latestData": {
        "canControlHumidification": false,
        "drData": {
            "CoolSetpLimit": 0,
            "DeltaCoolSP": -0.01,
            "DeltaHeatSP": -0.01,
            "HeatSetpLimit": 0,
            "OptOutable": false,
            "Phase": -1
        },
        "fanData": {
            "fanMode": 0,
            "fanModeAutoAllowed": true,
            "fanModeCirculateAllowed": false,
            "fanModeFollowScheduleAllowed": false,
            "fanModeOnAllowed": true
        },
        "hasFan": true,
        "uiData": {
            "BatteryStatus": 0,
            "Commercial": false,
            "CoolLowerSetptLimit": 50.0,
            "CoolNextPeriod": 66,
            "CoolSetpoint": 80.0,
            "CoolUpperSetptLimit": 99.0,
            "Deadband": 3.0,
            "DeviceID": 12345,
            "DispTemperature": 75.0,
            "DispTemperatureAvailable": true,
            "DispTemperatureStatus": 0,
            "DisplayedUnits": "F",
            "DualSetpointStatus": false,
            "HeatLowerSetptLimit": 40.0,
            "HeatNextPeriod": 66,
            "HeatSetpoint": 68.0,
            "HeatUpperSetptLimit": 90.0,
            "HoldUntilCapable": true,
            "IndoorHumidStatus": 128,
            "IndoorHumidity": 128.0,
            "IndoorHumiditySensorAvailable": false,
            "IndoorHumiditySensorNotFault": true,
            "IsInVacationHoldMode": false,
            "OBPolarity": 0,
            "OutdoorHumidStatus": 128,
            "OutdoorHumidity": 128.0,
            "OutdoorHumidityAvailable": false,
            "OutdoorTemp": 128.0,
            "OutdoorTempStatus": 128,
            "OutdoorTemperatureAvailable": false,
            "RawMessageID": 0,
            "SchedCoolSp": 75.0,
            "SchedHeatSp": 68.0,
            "ScheduleCapable": true,
            "SenseFromHereAllowed": false,
            "SensorAveraging": false,
            "SetpointChangeAllowed": true,
            "SouthernAwayAllowed": false,
            "StatSenseDispTemp": 75.0,
            "StatusCool": 1,
            "StatusHeat": 1,
            "SwitchAutoAllowed": true,
            "SwitchCoolAllowed": true,
            "SwitchEmergencyHeatAllowed": false,
            "SwitchHeatAllowed": true,
            "SwitchOffAllowed": true,
            "SystemSwitchPosition": 4,
            "TemporaryHoldUntilTime": 990,
            "ThermostatLocked": false,
            "TimeOfDayFlag": 0,
            "UIDataID": 9999,
            "VacationHold": 0,
            "VacationHoldUntilTime": 0
        },
        "weather": {
            "HasStation": true,
            "Humidity": "55",
            "Icon": "1_sunny%402x",
            "Phrase": "Sunny",
            "Temperature": "76"
        }
    },
    "success": true
}
Most of this is obvious - some of it must be pertinent to other types of thermostats which I do not have.
Honneywell doesn't seem to offer an "offical" API into this data, but they seem to for some of their other alarm data. Unfortunatley, they seem to only want to provide this stuff to alarm monitoring companies, as opposed to end-users. Hopefuly, someday they'll get the hint and open up a real environmental control API for end-users. Until then - Happy hacking!!